Senin, 30 Maret 2009

Membuat Poster Film Action


  Kita akan mencoba membuat sebuah "Poster Film Action".
 
Ciptakan dokumen baru dengan ukuran  750x550 pixels
Buka gambar penjara di seperti di bawah ini, drag kedalam dokumen baru yang kita buat tadi dan berikan nama penjara untuk layer gambar penjara ini.

Lakukan duplikat pada layer penjara dan beri nama Blurred Penjara.
  Select layer penjara dan masuk ke menu: Filter > Blur > Lens Blur. Centang pada Faster, rubah Blur Focal Distance menjadi 0, Iris Shape menjadi  Hexagon(6), Radius menjadi   25, Blade Curvature menjadi   0, Rotation menjadi   0,  Brightness menjadi   0, Threshold menjadi   255, Noise menjadi   0 dan Distribution menjadi    Uniform
 

Buka gambar orang nembak seperti ini
Crop dengan menggunakan Pen tool, dengan tujuan menghilangkan background nya. Sehingga tersisa orang nya saja.
 

Drag gambar orang di atas menuju ke dokumen baru kita. Rename layer orang ini dengan nama Hero. Lakukan resize dan sesuaikan ukurannya.
Pilih  Soft Eraser tool dengan ukuran 800pt, klik satu kali di tengah2 layer Blurred penjara
 

Ciptakan sebuah layer baru di atas Hero dan berian nama Bayangan.
Lakukan Fill terhadap layer itu dengan warna #000000 gunakan Paint Bucket. Sesuaikan opacity nya layer ini menjadi 80%.

Pilih Soft Eraser tool dengan ukuran 800pt, klik satu kali di tengah2 layer Bayangan.
 

  Layer > New Adjustment Layer > Hue/Saturation   diatas semua layer, dengan komposisi :
Dan set Hue menjadi 0, Saturation menjadi -40 dan Lightness menjadi 0.

  Layer > New Adjustment Layer > Exposure Adjustment diatas semua layers.
Dan set  Exposure menjadi +0.6, Offset menjadi -0.01 dan Gamma Correction menjadi 1.2.

  Layer > New Adjustment Layer > Levels Adjustment diatas semua layers.
  Dan set Set nilai menjadi 20, 1, 240 dan kamu akan selesai :)


Sumber dari situs Ilmu Website dalam kategori photoshop dengan judul Membuat Poster Film Action

Mengaktifkan Sticky Pada Joomla


Apasih sticky? Sticky bukanlah band papan atas dalam negeri yang
terkenal karena lagu "Mungkinkah!" :D Sticky adalah suatu fitur yang
dapat membuat suatu artikel selalu pada posisi awal halaman index dalam
joomla! dikenal dengan istilah frontpage. Yang terjadi jika sticky
diaktifkan adalah suatu artikel selalu berada pada halaman depan atas
meskipun terdapat artikel baru yang diletakkan di frontpage. Untuk
mengaktifkan sticky pada joomla cukup mudah, karena tidak memerlukan
module, atau plugin sama sekali untuk mengaktifkannya, tidak seperti
cms lain :D. Anda cukup login sebagai admin pada joomla!. Kemudian
masuk menu content | Front Page Manager.


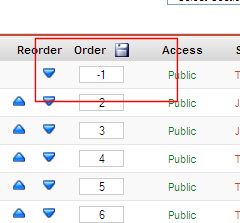
Setelah, pilih artikel yang akan dijadikan sticky, kemudian pada Order beri nilai -1, seperti gambar di bawah ini,


Kemudian save order.


Untuk melihat hasilnya berpengaruh atau tidak, silahkan masukkan artikel baru.

Sekian. Terima Kasih.


Segera Majalah Ilmuwebsite edisi 2, membahas :

75 Widget, Plugin, Extension, Component,

dan Module pilihan, erbagai CMS Favorit anda.


Sumber dari situs Ilmu Website dalam kategori review cms dengan judul Mengaktifkan Sticky Pada Joomla

Membuat pertanyaan konfirmasi

Posted By: Ivan Yudianto

Membuat pertanyaan konfirmasi

06-06-2008 | 10:42:40 | Halaman Ini dibaca 13700 kali


Dalam membuat program, ada kalanya kita ingin agar data yang diinput tidak salah. Teknik Validasi yang anda terapkan pun, misalnya validasi nama tidak boleh angka terkadang tidak maksimal. Kalau misalnya kita salah mengetik nama “Ivan” dengan “Ivam”, pasti nama akan lansung tersimpan bukan? Bukan hanya itu, biasanya seorang user tidak sengaja menekan tombol “enter”. Padahal belum selesai mengetik. Ada cara untuk mengatasi hal diatas, yakni dengan membuat pertanyaan konfirmasi. Pertanyaan konfirmasi berfungsi untuk menampilkan pertanyaan “ok” dan “cancel”. Ini untuk memastikan apakah data yang diinput sudah benar dengan melakukan pengecekan ulang.

Pertanyaan konfirmasi sepeti diatas dapat dibuat dengan javascript.

Buat file dengan nama pertanyaan.js lalu ketikkan script berikut :

pertanyaan.js

function pertanyaan()
{
if(confirm('Anda yakin yang ingin anda posting ini sudah benar?'))
{
return true;
}
else
{
return false;
}
}
index.html

< html >
< body >
< script language="javascript" src="pertanyaan.js">< /script>
< a href=# onclick=”return pertanyaan ()”>Tes membuat pertanyaan.....< /a>
< /body>
< /html>

Sedikit Penjelasan kode diatas :

Pada pertanyaan.js, dibuatkan perintah confirm untuk menampilkan kotak pesan ok dan cancel. Karena menggunakan function, kita gunakan return TRUE jika benar dan return FALSE jika salah. Lalu pada bagian yang ingin dimunculkan pertanyaan, tambahkan perintah onclick. Maksudnya ketika diklik,event apa yang terjadi.

Yah, sekian dulu lah penjelasan dari saya. Jika ada yang ingin ditanyakan, silahkan menghubungi saya di

Email1 : ivan@ilmuwebsite.com
Email 2 : ivan_wen_piao@yahoo.co.id
Web : http://ivan.ilmuwebsite.com

Silahkan download sourcenya Disini

Tab CSS Menu Sederhana


Suka dengan CSS menu? cobalah membuat CSS menu anda sendiri.

Berikut ada contoh membuat menu CSS sederhana, untuk proses belajar anda bisa memodifikasinya :)
Code nya:

------------------------------
<?xml version="1.0" encoding="iso-8859-1"?>
<!DOCTYPE html PUBLIC "-//W3C//DTD XHTML 1.1 Strict//EN" "http://www.w3.org/TR/xhtml1/DTD/xhtml1-transitional.dtd">
<html xmlns="http://www.w3.org/1999/xhtml" xml:lang="en" lang="en">
    <head>
         <meta
http-equiv="Content-Type" content="text/html; charset=ISO-8859-1"/>
         <title>DHTML Tab,JavaScript Tab</title>
    <style type="text/css">
         #tabs {display: block;float: left;width: 160px;}
         .panel
{border: solid 1px #D8D8D8;border-top: none;background-color:
#FFFFFF;padding: 0px;width: 158px;overflow: auto;clear: left;}
         .tab_bdr{padding:
0px;width: 158px;border: 0px;border: 1px solid #645DB5;height:
4px;margin:0px;background: #645DB5;clear: left;font-size: 0px;}
         .tab{font-family:tahoma;
FONT-SIZE:
11px;background:#BA0808;color:#FFFFFF;cursor:pointer;border:none;border-bottom:
1px solid #FFFFFF;height:19px;padding-top:3px;margin:0px;width:60px;
float:left; text-decoration:none;}
         .tab_sel{font-family:tahoma;
FONT-SIZE:
11px;background:#645DB5;color:#FFFFFF;cursor:pointer;border:none;border-bottom:1px
solid #645DB5;height:19px;padding-top:3px;margin:0px;width:60px;
float:left; text-decoration:none;}
    </style>
    <script language="JavaScript" type="text/javascript">
    var panels = new Array('panel1', 'panel2'); // IDs of the content panels must be put here
    var tabs = new Array('tab1', 'tab2'); // IDs of the tabs must be put here
    function displayPanel(nval)
    {
         for(i = 0; i < panels.length; i++)
         {
            
document.getElementById(panels[i]).style.display = (nval-1 == i) ?
'block':'none';
            
document.getElementById(tabs[i]).className=(nval-1 == i) ?
'tab_sel':'tab';
         }
    }
    </script>
    </head>
    <body>
         <div id="tabs">
            
<div id="tab1" class="tab_sel" align="center" onClick="javascript:
displayPanel('1');">Tab&nbsp;1</div>
            
<div id="tab2" class="tab" style="margin-left:1px;" align="center"
onClick="javascript: displayPanel('2');">Tab&nbsp;2</div>
         </div>
   
<div class="tab_bdr"></div> <!-- This is the div used to
show a thick border below the tab and above the panel-->
         <div
class="panel" id="panel1" style="display: block">1</div>
<!-- The display panels for the respective tabs can be put here
-->
         <div class="panel" id="panel2" style="display: none">2</div>
    </body>
</html>

------------------------------

contoh jadi: http://www.ilmuwebsite.com/test/css-tab.htm
Terimakasih

Sumber dari situs Ilmu Website dalam kategori html dengan judul Tab CSS Menu Sederhana

Trick Upload PHP Auto Rename

-
Tanggal : Tuesday, 31 March 2009 | Jam : 10 : 40 : 39 AM | GMT : +0700 | Negara : Indonesia

Posted By: Imran (imran_asa99@yahoo.com)

Trick Upload PHP Auto Rename

31-03-2009 | 08:04:51 | Halaman Ini dibaca 50 kali


Hai…para pengunjung setia ilmuwebsite.co, ini adalah artikel tentang php yang pertama kali saya tulis untuk ilmuwebsite.com hehehe. Salam kenal y….

Ok kita langsung saja pada inti pembahasan yaitu bagaimana mengupload file dengan menggunakan php ditambah sedikit trik pengembangan. Upload file merupakan salah satu fasilitas pada web yang kini semakin sering digunakan, file yang ada pada komputer local dapat kita simpan ke dalam directory server yang nantinya dimanfaatkan untuk berbagai keperluan. Dan tentunya setiap bahasa pemrograman web sudah dipastikan memiliki fungsi-fungsi tersendiri untuk melakukan upload file.
Seringkali saya bertanya pada diri sendiri “apabila terdapat 1 file yang diupload ke server, sedangkan terdapat file dengan nama yang sama pada server hosting, bagaimana caranya agar file yang sudah ada dengan nama yang sama tidak ter-replace/tertimpa oleh file yang baru diupload”.
Dan sekarang setelah mencari dan hunting diberbagai situs yang membahas tentang web programming akhirnya saya menemukan jawabannya.
Jawabannya adalah kita perlu melakukan sebuah validasi sebelum file di kirim ke server. Validasi itu berupa pengecekan apakah pada directory tujuan terdapat nama file yang sama dengan file yang akan kita upload.
Ok sekarang kita coba langsung kepada scriptnya saja. Yang perlu kita sediakan adalah :
Folder direktori yang nantinya akan kita gunakan sebagai tempat untuk menampung hasil dari proses upload. Contoh : saya berinama foldernya “upload”
Halaman form.php
Halaman action.php

Langkah pertama adalah membuat halaman form.php

< form action="action.php" method="post" enctype="multipart/form-data">
Pilih File Anda:
< input type="file" name="myfile" />
< input name="MAX_FILE_SIZE" type="hidden" id="MAX_FILE_SIZE" size="30000" />
< input type="submit" value="Upload" />
< /form>

Langkah selanjutnya adalah membuat halaman action.php. scriptnya sebagai berikut :

< ?php
$uploadDir = "../upload/";
// Apabila ada file yang di-upload
if(is_uploaded_file($_FILES['myfile']['tmp_name'])){
$uploadFile = $_FILES['myfile'];

// Extract nama file
$extractFile = pathinfo($uploadFile['name']);
$size = $_FILES['myfile']['size']; //untuk mengetahui ukuran file
$tipe = $_FILES['myfile']['type'];// untuk mengetahui tipe file

//Dibawah ini adalah untuk mengatur format gambar yang dapat di uplada ke server.
Anda bisa tambahakan jika ingin memasukan format yang lain tergantung kebutuhan anda.

$exts =array('image/jpg','image/jpeg','image/pjpeg','image/png','image/x-png');
if(!in_array(($tipe),$exts)){
echo 'Format file yang di izinkan hanya JPEG dan PNG';
exit;
}
// dibawah ini script untuk mengatur ukuran file yang dapat di upload ke server
if(($size !=0)&&($size>30000)){
exit('Ukuran gambar terlalu besar’);
}

$sameName = 0; // Menyimpan banyaknya file dengan nama yang sama dengan file yg diupload
$handle = opendir($uploadDir);
while(false !== ($file = readdir($handle))){ // Looping isi file pada directory tujuan
// Apabila ada file dengan awalan yg sama dengan nama file di uplaod
if(strpos($file,$extractFile['filename']) !== false)
$sameName++; // Tambah data file yang sama
}

/* Apabila tidak ada file yang sama ($sameName masih '0') maka nama file pakai
* nama ketika diupload, jika $sameName > 0 maka pakai format "namafile($sameName).ext */
$newName = empty($sameName) ? $uploadFile['name'] : $extractFile['filename'].'('.$sameName.').'.$extractFile['extension'];

if(move_uploaded_file($uploadFile['tmp_name'],$uploadDir.$newName)){
echo 'File berhasil diupload dengan nama: '.$newName;
}
else{
echo 'File gagal diupload';
}
? >


Pada script di atas saya hanya mengkhususkan file yang di upload adalah imang/gambar. Jika anda ingin mengupload file dengan format yang lain silahkan anda ganti baris berikut :
$exts =array('image/jpg','image/jpeg','image/pjpeg','image/png','image/x-png');
if(!in_array(($tipe),$exts)){
echo 'Format file yang di izinkan hanya JPEG dan PNG';
exit;
}

Dengan menjalankan script sederhana diatas maka jika pada server terdapat nama file yang sama maka file yang akan diupload akan digantikan dengan format: namaFile(jumlahFileYangSama).extensionFile”. Contohnya apabila di dalam server terdapat nama file “doc.pdf”, maka file yang akan diupload nantinya akan menjadi direname secara otomaris menjadi “doc(1).pdf”, apabila pada proses upload selanjutnya ada file yang diupload dengan nama “doc.pdf” juga maka file itu akan di-rename dengan nama “doc(2).pdf”, dan begitu seterusnya.

Silahkan download script lengkapnya di sini :
http://www.ilmuwebsite.com/submit/trik_upload_byimran.zip

Senin, 23 Maret 2009

Basic Strategy game - automated hourly money gain

Today I will try to explain how to create automated money gain (each hour)
Last time we created really basic system, so now it is time to upgrade it.

Main idea is that user gains some amount of money every hour (starting from his registration time). So theory is like this:

registration time (Unix timestamp - in seconds from 1970)
check in table when user money was last updated (row: lastupdate)
if this time is greater then 1 hour, then we update money
lets open our config.php file (which we will include_once in all our other documents). At bottom add:
//money amount to add for each round
$add_money = 1000;
//time now, and round time in seconds (1h=60*60seconds=3600)
$time_now = time();
$round = 3600;

//time of last update+time needed must be smaller then time now to update
if (($user[lastupdate]+$round) <= $time_now) {
//see how many rounds (hours) were there from last update
$nr_rounds = floor(($time_now-$user[lastupdate])/$round);
//calculate how much money user gained
$all_money = $nr_rounds * $add_money;
//calculate how many rounds in seconds (how many hours in seconds)
$add_time = $nr_rounds * $round;

//lets update users table
mysql_query("UPDATE users SET lastupdate=lastupdate+'$add_time', money=money+'$all_money' WHERE id = '$user[id]'") or die(mysql_error());

//here you can refresh page (so you can see progress) or select user again using login
}

You would say....oh my god it is so simple to make games! Well actually you need really good plan, then coding part is easy, although it needs time.

So in this lesson we learned how to add money to user every time he login. Script just checks for last update, and if there should be new update it does it. It adds money and it changes time of last update.
In next post I will explain how to allow users to spend their money to build and level-up economical structure (Bank), each level of Bank will add bonus of money gained each turn.

Feel free to comment and ask anything
POSTED BY SALJUTIN AT 12:20 PM

Basic Strategy game - upgrade money gain (with bank)

Today I will try to explain how to create Bank structure, which would allow us to make more money per turn.

First theory of this addon:

each level of bank adds 5%
level 1 cost 500 money to upgrade
each level costs 30% more then last one
Now we create formulas that we will code later.
Each level of bank adds 5%, so our idea is to multiply basic amount with some coefficient. In our case this is 1.05 for level 1, level 2 will be 1.05*1.05, level 3 will be 1.05*1.05*1.05. So you can see where this is leading; we can create universal formula by using level and basic amount.
Cash we gain is then: 1.05^banklevel , in PHP this is used by pow() function.
Exactly the same we will use for costs of next level, but percentage is higher so coefficient would be 1.30 in this case.

Now to coding! Lets open config.php (from last post) and modify it.
After this:
//money amount to add for each round
$add_money = 1000;
Add:
//coefficient to use (5% addon = 1.05)
$k_money = 1.05;

Now find:
//calculate how much money user gained
$all_money = $nr_rounds * $add_money;
And change it to:
//calculate how much money user gained
$all_money = $nr_rounds * $add_money * pow($k_money, $user[bank]);

This "pow($k_money, $user[bank])" will work like we wanted to (1.05 ^ banklevel).

Now lets create new php file like upgrade.php (don't forget to include config.php in beginning of file).
//calculate money needed for next level of bank upgrade (php part of file)
$need_money = 500 * pow(1.30, $user[bank]);

//we must create form for upgrades (html part of file) with button.


Bank level:

Next level:


//now we create another php part of this file (you could put that on top right after when you calculate $need_money), where we will tell what to do when button is pressed.
if ($_POST[upgradebank]) {

//we check if user has enough money to upgrade bank
if ($user[money] < $need_money) {
//we use die function to stop script execution and to show message what is wrong
die ("You don't have enough money to upgrade Bank!");
}

//everything is OK, we update our user table
mysql_query("UPDATE users SET money=money-'$need_money', bank=bank+'1' WHERE id='$user[id]'");

}


This concludes our tutorial, come back for more.
Next time we will create system which allows user to train units.

Any questions, ideas and comments are welcome.
POSTED BY SALJUTIN AT 1:23 AM

Basic Strategy game - train units

Today I will try to explain how to train and untrain units, which user will use to attack others or defend himself.

Theory is simple:

each unit cost 100 money
if you untrain unit it refunds you with 50 money
Now lets create new php file like train.php (don't forget to include config.php in beginning of file).

//we need 2 form parts (html)


Number:


Number:


//now for the PHP part
//first if train button is pressed
if ($_POST[train]) {
$train_s = strip_tags(addslashes($_POST[train_s])); //number of soldiers trained

//we check if it is numeric and positive
if (!is_numeric($train_s)) { die("Wrong input!"); }
if ($train_s < 0) { die("Wrong input!"); }

//we check if we have enough money
$train_money = $train_s * 100;
if ($user[money] < $train_money) { die("Not enough money to train so many units!"); }

//if script got it to this point it was all ok so we can update
mysql_query("UPDATE users SET money=money-'$train_money', units=units+'$train_s' WHERE id='$user[id]'");
}

//we now make script which will run if we press Untrain button
if ($_POST[untrain]) {
$untrain_s = strip_tags(addslashes($_POST[untrain_s])); //number of soldiers trained

//we check if it is numeric and positive
if (!is_numeric($untrain_s)) { die("Wrong input!"); }
if ($untrain_s < 0) { die("Wrong input!"); }

//we check if user has enough units to untrain
if ($user[units] < $untrain_s) { die("You cannot untrain so many units!"); }

//if script got it to this point it was all ok so we can update, but first calculate amount of gained money
$gain_money = $untrain_s * 50;
//we update, so we add money gained because of untraining units, and change number of units
mysql_query("UPDATE users SET money=money+'$gain_money', units=units-'$train_s' WHERE id='$user[id]'");
}

This is all for now. Soon we will create script that would allow us to buy weapons.
Bye - until next time
POSTED BY SALJUTIN AT 3:18 AM

Basic Strategy game - simple attack script

Hello again. First of all, I like to say sorry to all readers of this blog (if any ). I was quite busy for last 2 weeks, but hey at least you all have time to really get into last tutorials and understand things!
So lets start. In this tutorial I will try to explain how to create simple attack script.

As always theory first:

user browses user list and attack user he wants to
soldier will have basic strength of 100
equipping weapon1 would double output of soldier, so 200
weapon2 is 400 and with weapon3 is 800
number of casualties on each side will depend on amount of damage dealt
Now we need some file where we will browse users, choose who to attack and see battle report. Lets create file like battle.php (don't forget to include config.php in beginning of file).
//this file will be all in php
//if user did not select who to attack, we show him list of users
if (!$_GET[attack]) {
//we select id and username of everyone except us
$battleQ = mysql_query("SELECT id,username FROM users WHERE id<>'$user[id]'");
while ($battle = mysql_fetch_array($battleQ)) {
//we show all selected users as well as link to their "attack" subpage
echo "$battle[username] => attack
";
}
}

//if user selected link to attack player
if ($_GET[attack]) {
$attack_id = $_GET[attack];
//we check if ID submited is numerical
if (!is_numeric($attack_id)) { die("Bad target ID!"); }
//we select user with that ID
$attackQ = mysql_query("SELECT * FROM users WHERE id='$user[id]' LIMIT 1");
$attackR = mysql_num_rows($attackQ);
//we check that rows are 1. if there are zero rows this means user is modifying link so we close our script!
if ($attackR <> 1) { die("Bad target ID!"); }
//all is fine, we select attacked user
$attack = mysql_fetch_array($attackQ);

//now we divide weapons to our people
if ($user[weapon3]<=$user[units]) {
//if weapon3 is more or the same of all people, then all people have it
$user_w3 = $user[units];
}else{
//only some users get weapon3
$user_w3 = $user[weapon3];
}

if ($user[weapon2]<=($user[units]-$user_w3)) {
//if weapon2 is more or the same of our people without any weapons, then they have it
$user_w2 = $user[units]-$user_w3;
}else{
//only some users get weapon3
$user_w2 = $user[weapon2];
}

if ($user[weapon1]<=($user[units]-$user_w3-$user_w2)) {
//if weapon1 is more or the same of our people without any weapons, then they have it
$user_w1 = $user[units]-$user_w3-$user_w2;
}else{
//only some users get weapon3
$user_w1 = $user[weapon1];
}

//those are our people without weapons
$user_w0 = $user[units]-$user_w3-$user_w2-$user_w1;

//now we calculate our strength
$user_strength = $user_w0*100 + $user_w1*200 + $user_w2*400 + $user_w3*800;

//We do the same thing for attacked player

//now we divide weapons to attacker
if ($attack[weapon3]<=$attack[units]) {
$target_w3 = $attack[units];
}else{
$target_w3 = $attack[weapon3];
}

if ($attack[weapon2]<=($attack[units]-$target_w3)) {
$target_w2 = $attack[units]-$target_w3;
}else{
$target_w2 = $attack[weapon2];
}

if ($attack[weapon1]<=($attack[units]-$target_w3-$target_w2)) {
$target_w1 = $attack[units]-$target_w3-$target_w2;
}else{
$target_w1 = $attack[weapon1];
}

//those are people who we attacked without weapons
$target_w0 = $attack[units]-$target_w3-$target_w2-$target_w1;

//now we calculate defender strength
$target_strength = $target_w0*100 + $target_w1*200 + $target_w2*400 + $target_w3*800;

//now to calculate casualties; we would divide strength with four (4) and then check the percentage of troops died
$att_cas = $target_strength/4;
$def_cas = $user_strength/4;

//we create formula but see that we have $target_w0 on both sides of / so we can use simple formula
//$target_w0_die = ($def_cas/$target_w0*100)*$target_w0;
$target_w0_die = ($def_cas/100);
//we cannot have more death people then we have
if ($target_w0_die >) { $target_w0_die=$target_w0; }
$target_w1_die = ($def_cas/200);
if ($target_w1_die >) { $target_w1_die=$target_w1; }
$target_w2_die = ($def_cas/400);
if ($target_w2_die >) { $target_w2_die=$target_w2; }
$target_w3_die = ($def_cas/800);
if ($target_w3_die >) { $target_w3_die=$target_w3; }
$target_killed = $target_w0_die+$target_w1_die+$target_w2_die+$target_w3_die;

//the same for our troops
$user_w0_die = ($att_cas/100);
if ($user_w0_die >) { $user_w0_die=$user_w0; }
$user_w1_die = ($att_cas/200);
if ($user_w1_die >) { $user_w1_die=$user_w1; }
$user_w2_die = ($att_cas/400);
if ($user_w2_die >) { $user_w2_die=$user_w2; }
$user_w3_die = ($att_cas/800);
if ($user_w3_die >) { $user_w3_die=$user_w3; }
$user_killed = $user_w0_die+$user_w1_die+$user_w2_die+$user_w3_die;

//we have two options
//attacker won
if ($user_strength > $target_strength) {
echo "Your troops won. You lost $user_killed units! You managed to plunder $attack[money] money.";

//we update attacker and defender, add money to attacker
mysql_query("UPDATE users SET money=money+'$attack[money]', units=units-'$user_killed' WHERE id='$user[id]'");
mysql_query("UPDATE users SET money='0', units=units-'$target_killed' WHERE id='$attack[id]'");
}

//defender won
if ($user_strength <= $target_strength) {
echo "Enemy troops were too strong. You lost $user_killed units!";

//we update attacker and defender
mysql_query("UPDATE users SET units=units-'$user_killed' WHERE id='$user[id]'");
mysql_query("UPDATE users SET units=units-'$target_killed' WHERE id='$attack[id]'");
}

}

This concludes our tutorial. I hope it was worth to wait for it!

Remember: It is not your PHP knowledge that would make game good, it is your logic and thinking! Once you have all formulas done, its easy to put them in PHP code! Read first post in this blog and you can learn basics of creating good plan of game.

What else can we do in this script:
formula to determine percentage of money won
formula to calculate loss of weapons
report system (so attacked user can see report of attack)
But this is up to you. I will be glad if you comment on this post, tell me about your ideas or show-off your game
Till next time ... enjoy.
POSTED BY SALJUTIN AT 8:47 AM

Alternating Table Row Background Colors Using PHP

Feb17 in Design & Coding by David Shaw
I have put together this tutorial to help you alternate the background colors of table rows. Alternating table row background colors it will make it easier for your website’s users to understand data in tables, as well as making your table look better.


We will be using loops to loop through the table rows, and check to see if they even or odd numbered. If they are even they will be given one background color and if they are odd they will be given another.

We are assuming that you have some basic knowledge of using loops in PHP, and an understanding of simple HTML syntax, if you dont have a idea about basic HTML syntax then have a look at our HTML Cheat Sheet.

The first thing that you will need to do is to create your table:

view plaincopy to clipboardprint?


Once you have your table you will need to add your PHP code between the ‘table’ tags.

For this example I am going to use a table with 10 rows. But you can adapt this so that it uses the mysql_numrows() function after requesting data from MySQL.

So we now need to define the number of rows we require and begin the loop:

view plaincopy to clipboardprint?

$num = 10;

// define and start loop
for($i=0;$i<$num;$i++){
In the above code we set the number of rows, we then started a for loop by setting the row number to ‘0′ ($i=0). We then set our parameter so while the row number is less than the number specified the loop continues ($i<$num). We then set the row number to increase by ‘1′ everytime the loop is run ($i++).

We will now move onto the meaty bit. The code works by setting every even numbered row to the first color and any odd numbered row to the second color.

The code looks like this:

view plaincopy to clipboardprint?
// if row number is even use first color, if it is odd use the second
if($i % 2 ==0)
{
$bgcolor='#ffffff';
}
else
{
$bgcolor='#000000';
}

// output the table row with the correct background color
echo " Row Number is $i ";

// close loop
}
?>
The code above sets the background colors and then outputs the table rows. You can use this to help the users experience when using tables on your website, and also looks alot better than having the same background color throughout.

The complete PHP code that goes between your ‘table’ tags to alternate table row background colors looks like this:

view plaincopy to clipboardprint?

$num = 10;

// define and start loop
for($i=0;$i<$num;$i++){

// if row number is even use first color, if it is odd use the second
if($i % 2 ==0)
{
$bgcolor='#ffffff';
}
else
{
$bgcolor='#000000';
}

// output the table row with the correct background color
echo " Row Number is $i ";

// close loop
}
?>
You can now use PHP to alternate table row background colors on your website.

Feel free to comment on this code below.

The fastest way to see how many people are online at your site

Recently after a server crash, I wanted to know which of my sites have the most users online. Knowing that information would help me to determine which site is having the extra traffic, but what is the faster way to do this?

There are several ways to see how many people are browsing your site. In my case I wanted a very fast one that wont produce more overhead to the server, as my server has already been crashed from that traffic peak.

The theory

Php in most cases uses files to store session data. In general those files are stored in the /tmp directory (for unix based servers) and this is defined in the session.save_path php.ini directive.

The cool thing about php is that we can have different directives for each site, so we could use a different directory for each site. This way our site specific directory will hold one file for each session, and without any extra overhead we will be able to know how many people are browsing the site.

In fact this tweak will have better performance, as there will be less files for php to handle, and it is more secure. The last one is because if all sessions are stored in the same directory then it is possible for someone to hijack a session from another domain.

Let's play with the sessions

To do this we will first need to create a directory which will hold the files. The important thing on this is to know the directory path in the filesystem. So if the directory is under our home dir, then we will need to know the path /usr/home/sessions This directory should have write permissions, so to be sure you can chmod it to 755.

Now we need to change some php directives in order to make this work. If your host provides you with a php.ini file for your site, then you should open it and edit it as follows:

Code:
session.save_handler = "files"
session.save_path = "/usr/home/sessions/"
session.auto_start = 1

If php.ini is not an option, then you can create (or edit) an .htaccess file in your web root (document root) and add the following:

Code:
php_value session.save_handler files
php_value session.save_path /usr/home/sessions/
php_value session.auto_start 1

Finally there is a third way to achieve this. Open a php file that is included in your whole web site, and add these lines in the beginning :

Code:
ini_set('session.save_handler', 'files');
ini_set('session.save_path', '/usr/home/sessions/');
ini_set('session.auto_start', 1);
?>

Now that your site has each own session directory, you can easily get the number of online visitors by using something like this :

Code:
echo ((int)count(explode("\n",shell_exec('ls /usr/home/sessions')))) . ' users online';
?>

Encrypting Passwords in PHP Login Script

Feb20 in Design & Coding by David Shaw
This tutorial is a follow up to our PHP Login Script Tutorial. You will learn how to encrypt passwords to make your login script more secure.


To encrypt the passwords we will be using the md5() function. For the purpose of this tutorial we will use the same details as we used in the PHP Login Script Tutorial.

This is the data we added to the table in the Login Script Tutorial:

view plaincopy to clipboardprint?
INSERT INTO `members` VALUES (1, 'david', 'password');
As you can see the password is not very secure, with one quick glance you know the users username and password. Now if you used the MD5() function to encrypt the password it would look something like this:

view plaincopy to clipboardprint?
INSERT INTO `members` VALUES (1, 'david', '5f4dcc3b5aa765d61d8327deb882cf99');
As you can see that is not as easy to understand, and is alot more secure.

So how do we use the MD5() function on our Login Script?

Currently our login.php file looks like this:

view plaincopy to clipboardprint?
$host="localhost"; // Host name
$dbusername=""; // Mysql username
$dbpassword=""; // Mysql password
$db_name=""; // Database name
$tbl="members"; // Table name

// This connects to server and then selects the members databse.
mysql_connect("$host", "$dbusername", "$dbpassword")or die("cannot connect");
mysql_select_db("$db_name")or die("cannot select DB");

// Assign the username and password from the form to variables.
$username=$_POST['username'];
$password=$_POST['password'];

$sql="SELECT * FROM $tbl WHERE username='$username' and password='$password'";
$result=mysql_query($sql);

// This counts to see how many rows were found, there should be no more than 1
$count=mysql_num_rows($result);
// If result matched $username and $password, table row must be 1

if($count==1){
// Register $username, $password and send the user to the file "login_success.php"
session_start();
session_register("username");
session_register("password");
header("location:login_success.php");
}
else {
echo "Wrong Username or Password";
}
?>
To convert this code to accept MD5 encrypted passwords we need to add one extra line of code and edit the sql query.

When we get the password from the form, we added it to a variable, we now need to take this variable and encrypt the contents of it using the MD5() function, we can do that by using the code below:

view plaincopy to clipboardprint?
$encrypted_password=md5($password);
We now need to change the sql query so that it is now searching the database for encrypted password. We need to change it from:

view plaincopy to clipboardprint?
$sql="SELECT * FROM $tbl WHERE username='$username' and password='$password'";
to the following:

view plaincopy to clipboardprint?
$sql="SELECT * FROM $tbl WHERE username='$username' and password='$encrypted_password'";
So there you have it you can now use encrypted passwords in your login script. The new code in full for your login.php file is:

view plaincopy to clipboardprint?
$host="localhost"; // Host name
$dbusername=""; // Mysql username
$dbpassword=""; // Mysql password
$db_name=""; // Database name
$tbl="members"; // Table name

// This connects to server and then selects the members databse.
mysql_connect("$host", "$dbusername", "$dbpassword")or die("cannot connect");
mysql_select_db("$db_name")or die("cannot select DB");

// Assign the username and password from the form to variables.
$username=$_POST['username'];
$password=$_POST['password'];
$encrypted_password=md5($password);

$sql="SELECT * FROM $tbl WHERE username='$username' and password='$encrypted_password'";
$result=mysql_query($sql);

// This counts to see how many rows were found, there should be no more than 1
$count=mysql_num_rows($result);
// If result matched $username and $password, table row must be 1

if($count==1){
// Register $username, $password and send the user to the file "login_success.php"
session_start();
session_register("username");
session_register("password");
header("location:login_success.php");
}
else {
echo "Wrong Username or Password";
}
?>
Please remember that in order for this to work you need to encrypt the users password when you add it to the database when they register.

We will be adding a Register Script Tutorial later this week, so sign up to the RSS Feed to be notified when it is published.

Any comments can be posted below.

PHP Session Tutorial

Feb14 in Design & Coding by David Shaw
Are you at the stage where your website needs to pass information from one page to another? If so then you might want to learn about PHP Sessions.


What are PHP Sessions?

A PHP session allows you to store information on the server for use on later pages, for example a username or shopping cart items. They can also be used in our PHP Login Script Tutorial.

PHP sessions are not permanent, so once the user leaves your website the information is lost. So you need to decide whether PHP Sessions are the best option for your site.

Sessions work by creating a unique identification(UID) number for each visitor and storing variables based on this ID. This helps to prevent two users’ data from getting confused with one another when visiting the same webpage.

If you are sure that you want to use PHP sessions then keep on reading, as we explain how to use PHP sessions on your website.

Starting a PHP Session

Before you can store any information in your PHP session you need to start the session. You start the session using the following code:

view plaincopy to clipboardprint?
session_start();
?>
This needs to be at the very beginning of the code in your web page, before any HTML tags.

Storing Session Variables

Now that you can start a PHP Session, you will want to store information in it, that can be passed between the web pages.

The code below stores the value ‘david’ in the ‘username’ session:

view plaincopy to clipboardprint?
session_start();
$_SESSION['username'] = david;
?>
Retrieving Session Variables

We have now stored the value ‘david’ in the ‘username’ Session Variable. You will most likely want to output or use this variable, it can be output using the following code:

view plaincopy to clipboardprint?
session_start();
echo "Username = ". $_SESSION['username'];
?>
You can now store and retrieve PHP session variables.

Cleaning Sessions

PHP Session variables are only temporary, but you may still want to clean them out during the session. For example, if you are using your session variables to store shopping cart information, you may want to remove the items after the order is placed.

We will continue from the previous examples and clean the ‘username’ session, this can be done using the code below:

view plaincopy to clipboardprint?
session_start();
unset($_SESSION['username']);
?>
This will clear any information held inside the session variable.

Destroying Sessions

If you want to completly destroy the session, such as a user logging out. Then you need to use the following code:

view plaincopy to clipboardprint?
session_start();
session_destroy();
?>
WARNING: By destroying the session you will lose all information stored inside the session.

You can now create, store, retrieve, clean and destroy PHP sessions.

If you have any problems please feel free to comment on this post and I will try to answer them as quickly as possible.

Where Next? You could now try using these PHP Sessions inside a PHP Login Script and then learn how to encrypt your PHP login script.